Việc ghi chú video trong Obsidian là sự khác biệt giữa việc xem một video và xây dựng một cơ sở kiến thức lâu dài, có thể tìm kiếm. Thách thức là thu hẹp khoảng cách giữa nội dung video thoáng qua và kho lưu trữ cục bộ của bạn, biến hàng giờ hướng dẫn thành những hiểu biết mà bạn thực sự sở hữu.
Tại Sao Học Video Thụ Động Không Hiệu Quả
Chúng ta đều đã từng trải qua. Bạn xem một bài giảng dài hai giờ trên YouTube hoặc một khóa học Udemy và cảm thấy hiệu quả. Một tuần sau, hầu hết thông tin đó đã biến mất. Đây là vấn đề cốt lõi của việc xem thụ động—nó tạo ra ảo giác về việc học mà không xây dựng được kiến thức bền vững.
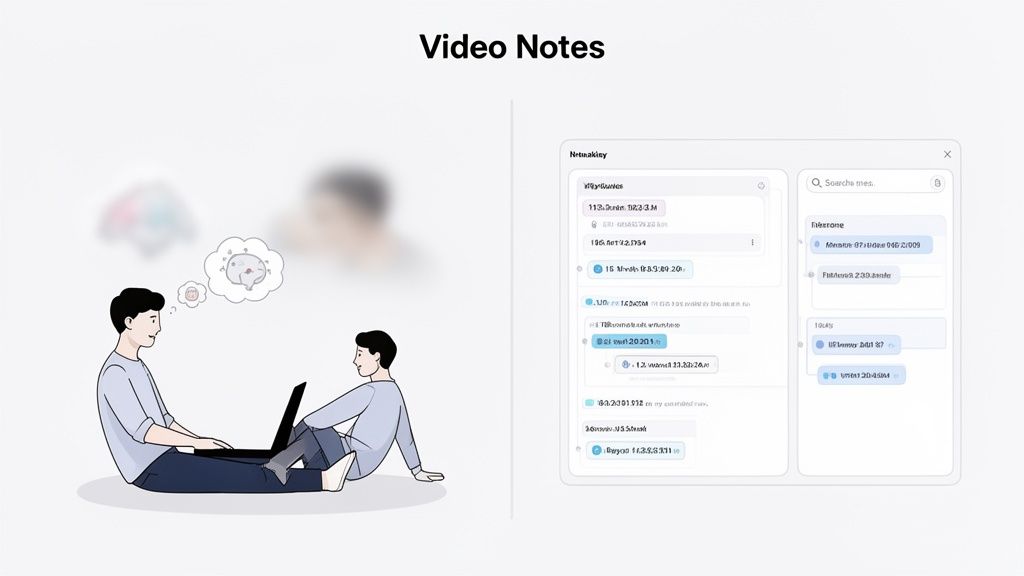
"Giải pháp" thông thường là ghi chú thủ công thường còn tệ hơn. Bạn liên tục phải tạm dừng và tua lại, vội vã gõ trong một cửa sổ khác. Bạn chụp ảnh màn hình các sơ đồ hoặc mã nguồn, nhưng chúng lại nằm trong một thư mục ngẫu nhiên trên máy tính, không liên kết với các ghi chú mà chúng minh họa. Việc chuyển đổi ngữ cảnh liên tục này phá vỡ sự tập trung của bạn và giết chết mọi động lực học tập. Sự khó xử khi viết vào sổ tay trong khi xem màn hình là một rào cản thực sự.
Vấn Đề Mất Ngữ Cảnh
Thất bại lớn nhất của hầu hết các phương pháp ghi chú là mất đi bối cảnh trực quan. Một bản ghi chép cho bạn biết điều gì đã được nói, nhưng nó bỏ lỡ điều gì đã được hiển thị. Chuyển động chuột tinh tế trong một hướng dẫn phần mềm, dòng mã cụ thể được tô sáng, hoặc công thức trên bảng trắng—tất cả những thông tin quan trọng đó đều bị mất. Hình ảnh rất quan trọng.
Giá trị thực sự đến từ việc kết nối những hiểu biết bằng văn bản của bạn trực tiếp với nguồn trực quan. Một hệ thống hiệu quả cho ghi chú video phải bảo tồn liên kết này, cho phép bạn quay lại đúng khoảnh khắc một khái niệm được giải thích trên màn hình.
Thu Hẹp Khoảng Cách Bằng Công Cụ Phù Hợp
Sự phát triển của việc học dựa trên video đã tạo ra nhu cầu về các công cụ tốt hơn. Đây là lý do tại sao các plugin Obsidian như Media Notes trở nên phổ biến, đạt hơn 21,978 lượt tải xuống, và tại sao các tiện ích mở rộng như HoverNotes có hơn 8,000+ lượt cài đặt trên Chrome.
Không giống như các công cụ chỉ phân tích bản ghi, một số công cụ hiện đại xem video từng khung hình để tạo ghi chú, giống như con người. Điều này ghi lại bối cảnh trực quan mà các công cụ chỉ dựa trên bản ghi bỏ lỡ. HoverNotes là một tiện ích mở rộng của Chrome làm được điều này, xuất mọi thứ dưới dạng Markdown thuần túy và đưa thẳng vào kho Obsidian của bạn. Bạn có thể xem thêm dữ liệu về sự phổ biến của plugin tại Obsidian Stats.
Mục tiêu không chỉ là ghi chú. Đó là tạo ra một hệ thống tích hợp nơi việc học qua video chảy vào cơ sở kiến thức lâu dài của bạn. Đối với người dùng Obsidian nghiêm túc, điều này có nghĩa là tìm ra một quy trình làm việc lưu ghi chú dưới dạng các tệp Markdown cục bộ, sạch sẽ—hoàn chỉnh với ảnh chụp màn hình có dấu thời gian liên kết trở lại video. Ghi chú của bạn thuộc về bạn. Bạn có thể tìm hiểu thêm về cách ghi lại ghi chú video hiệu quả trong hướng dẫn chi tiết của chúng tôi.
Chọn Phương Pháp Ghi Chú Video Của Bạn
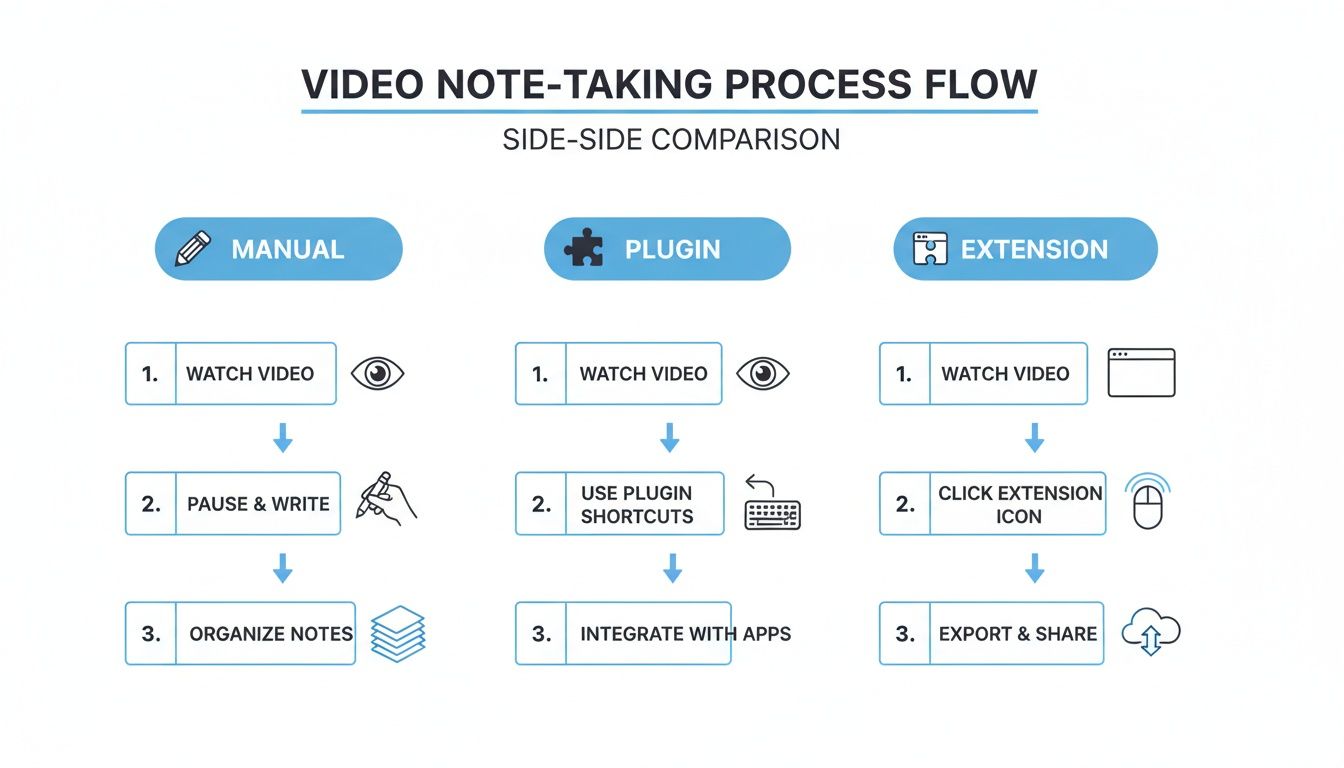
Vậy, làm thế nào để đưa ghi chú video vào Obsidian? Bạn có một vài lựa chọn, và cách tiếp cận phù hợp phụ thuộc vào cách bạn học và mức độ phiền phức bạn sẵn sàng chấp nhận. Hầu hết các quy trình làm việc đều thuộc ba loại. Hiểu rõ ưu và nhược điểm của chúng là chìa khóa để xây dựng một hệ thống bạn thực sự sẽ sử dụng.
Hãy cùng xem xét các ưu và nhược điểm thực tế của mỗi phương pháp.
Quy Trình Làm Việc Thủ Công
Đây là phương pháp mặc định: video phát ở một bên, ghi chú Obsidian mở ở bên kia. Bạn xem, gõ, tạm dừng, chụp ảnh màn hình, lưu tệp và kéo nó vào ghi chú của bạn.
Sức hấp dẫn là sự kiểm soát tuyệt đối. Thực tế là đó là một quá trình tẻ nhạt, đầy phiền phức. Việc tạm dừng liên tục, chuyển đổi ứng dụng và quản lý tệp làm gián đoạn sự tập trung của bạn. Tệ hơn nữa, ghi chú và ảnh chụp màn hình của bạn không được kết nối với dòng thời gian của video, khiến việc tìm lại ngữ cảnh ban đầu sau này trở nên khó khăn.
Các Plugin Obsidian Tích Hợp
Bước tiếp theo đối với nhiều người là một plugin Obsidian như Media Notes. Các công cụ này cho phép bạn nhúng một trình phát video trực tiếp vào ghi chú bằng cách dán URL từ các trang web như YouTube hoặc Vimeo. Đây là một chiến thắng lớn cho sự tập trung, vì mọi thứ đều nằm trong một cửa sổ.
Nhưng cách tiếp cận này cũng có những vấn đề riêng. Các plugin thường bị giới hạn ở các nền tảng cụ thể và có thể bị hỏng khi các trang web đó cập nhật mã của họ. Quan trọng hơn, bạn vẫn phải làm tất cả công việc nặng nhọc—gõ thủ công, tạm dừng và cố gắng ghi lại dấu thời gian. Chúng tích hợp trình phát, nhưng không tự động hóa việc ghi chú.
Tiện Ích Mở Rộng Trình Duyệt
Lựa chọn thứ ba là một tiện ích mở rộng trình duyệt ghi lại ghi chú trong khi bạn xem trên bất kỳ trang web nào—Udemy, Coursera, YouTube, hoặc thậm chí là một cổng thông tin đại học riêng. Các công cụ như HoverNotes phủ một bảng ghi chú trực tiếp bên cạnh video.
Cách tiếp cận này mang lại một bước nhảy vọt về hiệu quả và khả năng tương thích. Chỉ với một cú nhấp chuột (hoặc một phím tắt), bạn có thể chụp một ảnh màn hình có dấu thời gian và thả nó vào ghi chú của mình. Các công cụ tốt nhất trong danh mục này thậm chí còn sử dụng AI để tạo ghi chú bằng cách ghi lại cả lời nói và văn bản trên màn hình. Khi bạn hoàn thành, các ghi chú sẽ được lưu dưới dạng các tệp .md sạch sẽ trực tiếp vào kho Obsidian của bạn.
"Ghi chú được lưu dưới dạng tệp .md trực tiếp vào kho Obsidian của bạn, không có định dạng độc quyền hoặc dịch vụ đồng bộ hóa - ghi chú của bạn thuộc về bạn."
Nhược điểm là việc ghi lại ban đầu diễn ra bên ngoài Obsidian. Nhưng đối với nhiều người, triết lý "ghi lại ngay, sắp xếp sau" này ít gây gián đoạn hơn nhiều cho quá trình học tập. Bạn có thể tìm hiểu cách cấu trúc các ghi chú này bằng cách sử dụng Phương pháp Cornell để ghi chú video trong hướng dẫn khác của chúng tôi.
So Sánh Các Phương Pháp Ghi Chú Video Trong Obsidian
Bảng này so sánh ba phương pháp. Hãy suy nghĩ về điều bạn đánh giá cao nhất—đó là toàn quyền kiểm soát, một không gian làm việc thống nhất, hay tốc độ thuần túy?
| Phương pháp | Ưu điểm | Nhược điểm | Tốt nhất cho |
|---|---|---|---|
| Quy trình thủ công | Toàn quyền kiểm soát định dạng, hoàn toàn miễn phí. | Cực kỳ chậm, nhiều phiền phức, không có liên kết đến dòng thời gian video. | Các video ngắn hoặc người dùng muốn kiểm soát tuyệt đối. |
| Plugin Obsidian | Giữ video và ghi chú trong một cửa sổ, tích hợp tốt. | Hỗ trợ trang web hạn chế, phụ thuộc vào việc bảo trì plugin. | Người dùng chủ yếu học từ YouTube và muốn một môi trường khép kín. |
| Tiện ích mở rộng trình duyệt | Hoạt động trên mọi trang web, ảnh chụp màn hình có dấu thời gian, tự động hóa bằng AI. | Việc ghi lại ban đầu diễn ra bên ngoài Obsidian. | Người học đánh giá cao tốc độ, hiệu quả và tính linh hoạt của nền tảng. |
Hệ thống tốt nhất là hệ thống loại bỏ nhiều phiền phức nhất. Đối với hầu hết mọi người học từ các nguồn video khác nhau, sự linh hoạt của một tiện ích mở rộng trình duyệt là khó có thể đánh bại.
Cách Thiết Lập Quy Trình Làm Việc Trực Tiếp Đến Obsidian
Hệ thống tốt nhất cho ghi chú video là hệ thống loại bỏ càng nhiều phiền phức càng tốt. Việc nhập tệp thủ công hoặc sao chép-dán văn bản thêm vào những rào cản nhỏ có thể khiến bạn từ bỏ thói quen. Giải pháp là một quy trình làm việc trực tiếp đến Obsidian.
Bằng cách thiết lập điều này, ghi chú của bạn sẽ tự động đến nơi chúng thuộc về, loại bỏ các bước trung gian tẻ nhạt. Chìa khóa là một tiện ích mở rộng trình duyệt có thể ghi tệp trực tiếp vào máy tính của bạn. Điều này cho phép bạn trỏ vị trí lưu của tiện ích mở rộng đến một thư mục bên trong kho Obsidian của bạn, tạo ra một cầu nối liền mạch từ trình duyệt đến cơ sở kiến thức.
Tìm Đường Dẫn Kho Obsidian Của Bạn
Đầu tiên, bạn cần biết kho Obsidian của bạn nằm ở đâu trên máy tính. Đây là đường dẫn tệp cục bộ đến thư mục chứa ghi chú của bạn.
Để tìm nó:
- Mở Obsidian.
- Ở góc dưới bên trái, nhấp vào biểu tượng chuyển đổi kho (trông giống như một cánh cửa kho).
- Di chuột qua kho của bạn, nhấp vào menu ba chấm và chọn "Reveal vault in system explorer" (hoặc "Show in Finder" trên máy Mac).
Một cửa sổ trình duyệt tệp sẽ mở ra vị trí kho của bạn. Đây là đường dẫn bạn cần. Trên Windows, nó có thể trông giống như C:\Users\YourName\Documents\Obsidian\MyVault.
Cấu Hình Tiện Ích Mở Rộng Để Lưu Trực Tiếp
Với đường dẫn kho của bạn trong tay, bạn có thể kết nối trình duyệt của mình với Obsidian. Trong hướng dẫn này, chúng tôi sẽ sử dụng HoverNotes, một tiện ích mở rộng của Chrome có thể xem video cùng bạn, tạo ghi chú AI và lưu chúng dưới dạng tệp Markdown trực tiếp vào máy của bạn.
Sau khi cài đặt, hãy vào cài đặt của tiện ích mở rộng và tìm tùy chọn "Default Save Location". Dán đường dẫn kho của bạn vào đó.
Mẹo: tạo một thư mục riêng trong kho của bạn cho các bản ghi này, chẳng hạn như VideoNotes. Điều này giữ cho các ghi chú video thô tách biệt với các ghi chú đã được trau chuốt, lâu dài của bạn. Đường dẫn cuối cùng của bạn có thể trông giống như .../MyVault/Resources/VideoNotes. Đặt đường dẫn đó và bạn đã hoàn tất. Từ bây giờ, mọi ghi chú đã lưu sẽ ngay lập tức xuất hiện dưới dạng một tệp .md mới trong thư mục đó.
Như bạn có thể thấy, phương pháp tiện ích mở rộng đi thẳng vào vấn đề, đưa ghi chú trực tiếp vào kho của bạn.
Ghi Chú Video Đầu Tiên Của Bạn Với AI
Bây giờ hãy tìm một video trên bất kỳ nền tảng nào—YouTube, Coursera, Udemy, hoặc một bản ghi bài giảng. Bắt đầu tiện ích mở rộng và để nó tạo ghi chú. Bạn có thể thêm suy nghĩ của riêng mình hoặc sử dụng công cụ cắt để chụp ảnh màn hình của một sơ đồ hoặc đoạn mã cụ thể.
Không giống như các công cụ chỉ phân tích bản ghi, HoverNotes xem video để ghi lại những gì thực sự có trên màn hình. Khi bạn hoàn thành, hãy nhấn lưu.
Ghi chú, hoàn chỉnh với các bổ sung của bạn và ảnh chụp màn hình có dấu thời gian, sẽ được đưa trực tiếp vào thư mục kho của bạn dưới dạng một tệp Markdown sạch sẽ. Khi bạn mở Obsidian, nó đã ở đó.
Cách tiếp cận "ghi lại ngay, sắp xếp sau" này cho phép bạn đắm chìm trong video, biết rằng các điểm chính đang được lưu ở định dạng bạn hoàn toàn sở hữu. Bạn có thể tìm hiểu sâu hơn về các chi tiết cụ thể của việc kết nối HoverNotes và Obsidian trong hướng dẫn tích hợp đầy đủ của chúng tôi. Mỗi ảnh chụp màn hình bao gồm một dấu thời gian có thể nhấp—một cú nhấp chuột sẽ đưa bạn trở lại khoảnh khắc chính xác đó trong video.
Cách Sắp Xếp Ghi Chú Video Của Bạn Trong Obsidian
Đưa ghi chú vào kho của bạn chỉ là bước đầu tiên. Để biến thông tin thô đó thành kiến thức bền vững, bạn cần một hệ thống. Nếu không có, kho của bạn có thể trở thành một ngăn kéo kỹ thuật số lộn xộn. Mục tiêu là lồng ghép những hiểu biết mới vào biểu đồ kiến thức hiện có của bạn.
Sử Dụng Thẻ và Siêu Dữ Liệu Để Có Ngữ Cảnh Nhanh Chóng
Thẻ là cách nhanh nhất để thêm ngữ cảnh vào ghi chú. Một hệ thống gắn thẻ đơn giản, nhất quán giúp bạn tìm thấy ngay lập tức mọi thứ liên quan đến một chủ đề, nguồn hoặc dự án.
Bắt đầu với một vài thẻ cốt lõi cho mỗi ghi chú video:
#video-note: Một thẻ cấp cao để xem tất cả các ghi chú từ video.#source/youtubehoặc#source/udemy: Cụ thể hóa về nơi thông tin đến từ.#course/aws-certification: Đối với một loạt bài hoặc khóa học trực tuyến, hãy tạo một thẻ riêng để nhóm tất cả các ghi chú bài giảng liên quan.
Sử dụng các thẻ lồng nhau như source/youtube mang lại cho bạn một hệ thống phân cấp sạch sẽ để tìm kiếm mà không cần cấu trúc thư mục cứng nhắc.
Tạo Kết Nối Bằng Wiki-Links
Đây là nơi sức mạnh thực sự của Obsidian phát huy tác dụng: tạo các liên kết hai chiều giữa các ghi chú. Khi bạn xem lại ghi chú video của mình, hãy tích cực tìm kiếm cơ hội để liên kết các khái niệm với các ghi chú khác bằng cú pháp [[wiki-link]].
Ví dụ, nếu một video đề cập đến "JavaScript bất đồng bộ" và bạn đã có một ghi chú về chủ đề đó, hãy liên kết nó: [[JavaScript bất đồng bộ]]. Nếu chưa có, việc tạo liên kết sẽ tạo ra một trình giữ chỗ cho một ghi chú mới, nhắc bạn định nghĩa khái niệm đó sau.
Thói quen đơn giản này là điều biến một bộ sưu tập các ghi chú ngẫu nhiên thành một cơ sở kiến thức thực sự. Mỗi liên kết mới buộc bạn phải xem thông tin mới kết nối với những gì bạn đã biết như thế nào, làm sâu sắc thêm sự hiểu biết của bạn.
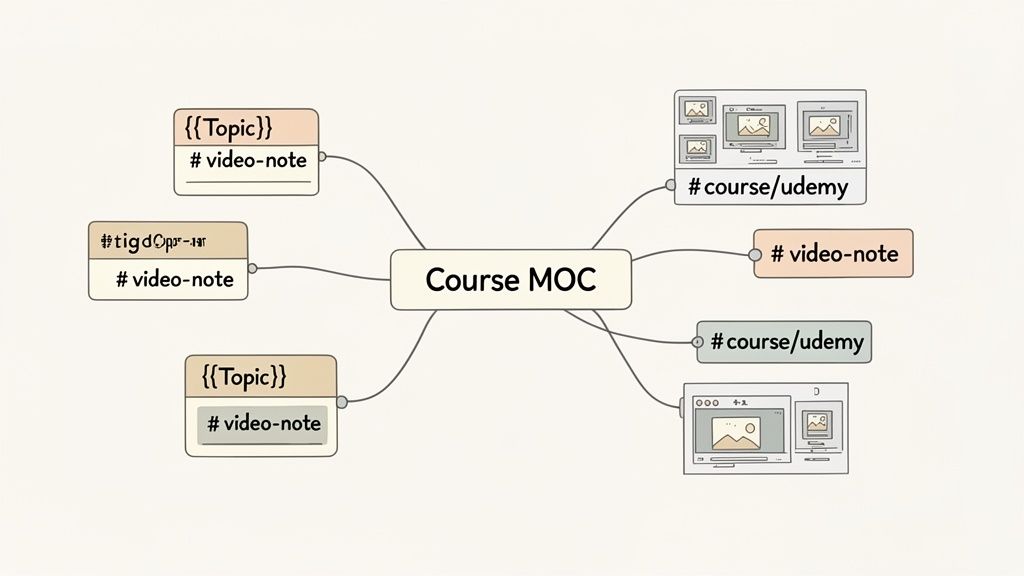
Xây Dựng Bản Đồ Nội Dung Cho Các Khóa Học
Khi làm việc qua một khóa học video nhiều phần, hãy tạo một trung tâm liên kết đến tất cả các ghi chú bài giảng riêng lẻ. Điều này thường được gọi là Bản đồ Nội dung (MOC).
Hãy nghĩ về MOC như một mục lục bạn tự xây dựng. Tạo một ghi chú mới—như [[AWS Certification Course MOC]]—và sau đó liệt kê và liên kết đến từng ghi chú video từ khóa học đó theo thứ tự. Điều này mang lại cho bạn một cái nhìn tổng quan về chương trình học, giúp việc xem lại trở nên dễ dàng. Bạn có thể tìm hiểu thêm về kỹ thuật này trong hướng dẫn của chúng tôi về cách tạo một cơ sở kiến thức.
Sức Mạnh Của Dấu Thời Gian Tương Tác
Một trong những tính năng hữu ích nhất của một quy trình ghi chú video tốt là ảnh chụp màn hình có dấu thời gian, có thể nhấp được. Trong Obsidian, những hình ảnh này trở thành các cổng tương tác trở lại tài liệu gốc.
Nếu bạn đang xem lại một ghi chú và không thể nhớ lại một chi tiết, chỉ cần nhấp vào ảnh chụp màn hình. Một công cụ như HoverNotes sẽ mở video gốc và chuyển đến khoảnh khắc chính xác đó. Điều này thu hẹp khoảng cách giữa bản tóm tắt của bạn và video gốc, giúp bạn không phải tua qua các dòng thời gian để tìm một đoạn clip cụ thể.
Tự Động Hóa Nâng Cao và Mẹo Năng Suất
Khi hệ thống của bạn để đưa ghi chú video vào Obsidian đã được thiết lập, bạn có thể làm cho nó nhanh hơn và thông minh hơn. Một vài tự động hóa có thể giảm bớt công việc thủ công, cho phép bạn tập trung vào nội dung, chứ không phải cơ chế ghi chú.
Mục tiêu là giảm thiểu gánh nặng nhận thức trong khi học. Mỗi giây dành cho tên tệp hoặc thẻ là một giây bạn không hấp thụ tài liệu.
Tự Động Hóa Siêu Dữ Liệu Với Mẫu Obsidian
Tính năng tạo mẫu của Obsidian là một yếu tố thay đổi cuộc chơi. Sử dụng plugin Templates cốt lõi hoặc plugin cộng đồng mạnh mẽ hơn là Templater, bạn có thể tự động thêm một cấu trúc và siêu dữ liệu nhất quán vào mỗi ghi chú video. Thay vì gõ đi gõ lại cùng một thông tin, một mẫu sẽ điền sẵn nó cho bạn.
Một mẫu ghi chú video đơn giản có thể bao gồm:
- URL Nguồn: Một trình giữ chỗ cho liên kết video.
- Kênh/Tác giả: Để theo dõi nguồn.
- Ngày Ghi Lại: Sử dụng một biến động như
{{date}}tự động điền. - Thẻ: Thêm ngay lập tức
#video-notevà có thể là một thẻ#review.
Điều này đảm bảo mọi ghi chú đều bắt đầu với một nền tảng sạch sẽ, có tổ chức. Khi một tệp Markdown mới xuất hiện trong kho của bạn, bạn chỉ cần chạy một lệnh để áp dụng mẫu.
Thành Thạo Các Phím Tắt Để Duy Trì Dòng Chảy
Liên tục chuyển đổi giữa chuột và bàn phím giết chết sự tập trung. Khi ghi chú từ một video có nhịp độ nhanh, các phím tắt là điều cần thiết. Một công cụ như HoverNotes được xây dựng cho việc này. Bạn có thể gán các phím tắt cho các hành động cốt lõi của nó, cho phép bạn điều khiển toàn bộ quá trình mà không cần rời tay khỏi bàn phím.
"Các phím tắt cho phép bạn chụp ảnh màn hình và điều hướng mà không làm gián đoạn dòng chảy của bạn."
Thiết lập các phím tắt tùy chỉnh cho các hành động như:
- Chụp ảnh màn hình toàn khung.
- Cắt một vùng cụ thể của màn hình (để chỉ lấy một đoạn mã hoặc sơ đồ).
- Bật/tắt chế độ video không bị phân tâm.
- Phát, tạm dừng và điều chỉnh tốc độ video.
Bộ nhớ cơ bắp bạn xây dựng được sẽ mang lại hiệu quả ngay lập tức. Bạn ngừng suy nghĩ về công cụ và chỉ tập trung vào nội dung. Kết hợp điều này với AI có thể xử lý việc ghi chú cho phép bạn tập trung hoàn toàn vào việc hiểu. Bạn có thể khám phá các ứng dụng ghi chú AI khác nhau để xem chúng phù hợp như thế nào với một hệ thống điều khiển bằng bàn phím, ưu tiên cục bộ.
Một Vài Câu Hỏi Thường Gặp Về Ghi Chú Video Trong Obsidian
Khi bạn hoàn thiện quy trình làm việc của mình, một vài câu hỏi thường xuất hiện.
Tôi Có Thể Thực Sự Ghi Chú Từ Các Video Trên Các Trang Web Như Coursera Hoặc Udemy Không?
Có. Mặc dù một số plugin Obsidian được xây dựng đặc biệt cho YouTube, một tiện ích mở rộng trình duyệt tốt hoạt động trên bất kỳ nền tảng nào. Các công cụ như HoverNotes được thiết kế để hoạt động trên bất kỳ trang web nào có trình phát video. Điều này có nghĩa là bạn có thể sử dụng cùng một quy trình cho một khóa học Coursera, một hướng dẫn Udemy, một lớp học LinkedIn Learning, hoặc một cổng thông tin bài giảng riêng. Nó hoạt động ở bất cứ đâu có video.
Sự Khác Biệt Thực Sự Giữa Một Plugin và Một Tiện Ích Mở Rộng Là Gì?
Điều đó phụ thuộc vào nơi công cụ thực hiện công việc của nó.
- Một plugin Obsidian chạy bên trong kho của bạn. Bạn dán một URL video vào một ghi chú, và nó nhúng một trình phát. Nó giữ mọi thứ trong một cửa sổ.
- Một tiện ích mở rộng trình duyệt chạy trong trình duyệt của bạn. Nó cho phép bạn ghi lại ghi chú trong khi xem trên trang web gốc, sau đó lưu tệp Markdown đã hoàn thành trực tiếp vào kho Obsidian của bạn.
Cách tiếp cận tiện ích mở rộng thường mang lại sự linh hoạt hơn, hoạt động trên nhiều trang web hơn và bao gồm các tính năng như chế độ video không bị phân tâm mà các plugin không thể cung cấp.
Làm Cách Nào Để Ghi Lại Hình Ảnh Như Sơ Đồ Hoặc Mã Nguồn?
Mô tả một sơ đồ phức tạp hoặc gõ lại mã nguồn là chậm và dễ xảy ra lỗi. Giải pháp tốt nhất là một công cụ ghi lại ảnh chụp màn hình có dấu thời gian. Khi bạn thấy một công thức quan trọng hoặc một đoạn mã, bạn nhấn một phím nóng.
Một quy trình làm việc tốt sẽ nhúng ảnh chụp màn hình đó trực tiếp vào ghi chú Markdown của bạn. Thậm chí tốt hơn, việc nhấp vào hình ảnh đó sau này trong Obsidian sẽ đưa bạn trở lại khoảnh khắc chính xác trong video, cung cấp ngữ cảnh trực quan quan trọng mà văn bản không thể sánh được.
Ghi Chú Của Tôi Có Được Lưu Ở Định Dạng Mở Không?
Đây là điều không thể thương lượng đối với bất kỳ ai coi trọng việc sở hữu dữ liệu của mình. Ưu tiên các công cụ lưu ghi chú của bạn dưới dạng các tệp Markdown thuần túy (.md). Điều này làm cho kiến thức của bạn bền vững với tương lai và ngăn nó bị khóa trong một ứng dụng độc quyền. Một công cụ ưu tiên cục bộ sẽ lưu các tệp này trực tiếp vào máy tính của bạn. Bạn sở hữu các tệp. Di chuyển chúng, sao lưu chúng, grep chúng—chúng chỉ là Markdown. Ghi chú của bạn là của bạn, mãi mãi.
Nếu bạn sử dụng Obsidian để học, HoverNotes sẽ lưu ghi chú trực tiếp vào kho của bạn dưới dạng Markdown sạch sẽ. Chỉ riêng tính năng chụp ảnh màn hình có dấu thời gian đã tiết kiệm hàng giờ xem lại. Bạn có thể dùng thử miễn phí—20 phút tín dụng AI, không cần thẻ tín dụng, tại https://hovernotes.io.