How to capture screenshots from videos for studying | HoverNotes
GeneralDecember 20, 2025
How to capture screenshots from videos for studying
Learn the best ways to screen capture from YouTube for your study notes. This guide covers manual methods, browser tools, and how to organize captures.
By HoverNotes Team•12 min read
Snapping a screen capture from YouTube is easy. But turning that image into a useful study tool is another story. The key is understanding why visuals are critical for actually learning from video.
Listening to a tutorial isn't enough. Learning happens when you connect what you hear with what you see. The problem is, manual note-taking while watching video is hard—constantly pausing and playing is tedious, and screenshots end up scattered with no connection to your notes.
We’ve all been there. You finish an hour-long tutorial, feeling like you've got it. A day later, you try to apply the knowledge and it’s gone. This is the classic retention problem with video learning—people watch but don't remember. A transcript gives you the words, but misses the visual context where the most important information lives.
This challenge is growing. YouTube's user base is projected to hit 2.70 billion monthly active users by 2025, a huge jump from 0.8 billion in 2012. With over 720,000 hours of new content uploaded daily, efficiently capturing and remembering visual information is a vital skill.
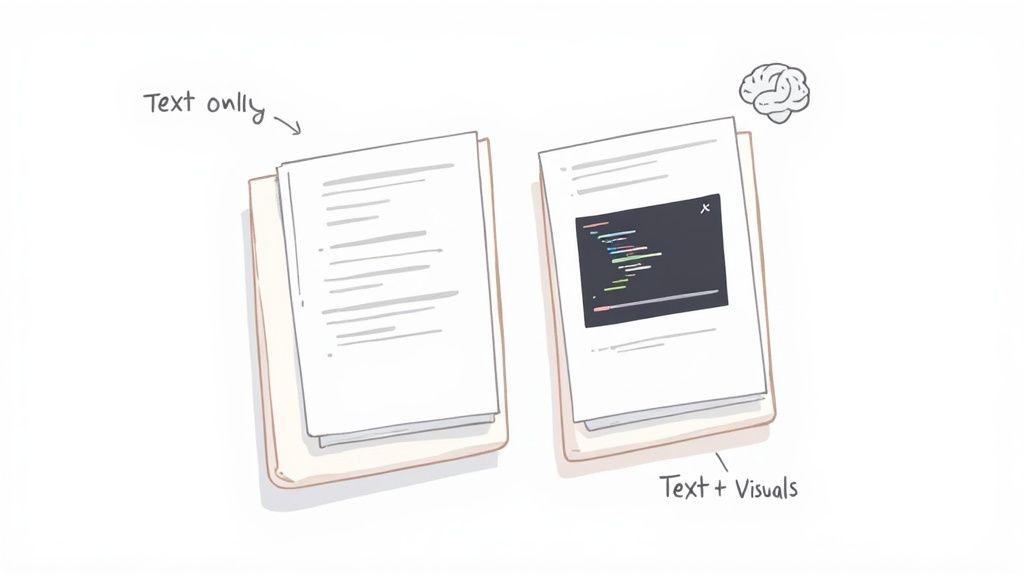
If you're just relying on typed summaries or transcripts, you're missing a huge piece of the puzzle. Words alone can't capture fundamentally visual details.
Think about what gets lost without a screenshot:
The exact line of code highlighted in a Python tutorial.
The specific UI element clicked in a Figma demo.
The shape of a graph in an economics lecture that illustrates a market crash.
A complex biological diagram explaining cellular respiration.
Without these visual anchors, your notes are just abstract descriptions. You're left trying to recall a picture from text. This is especially crippling for visual learners, who depend on seeing information to process it. You can learn more by exploring different study techniques for visual learners.
A screenshot acts as a cognitive shortcut. When you review your notes, the image instantly brings back the surrounding video context, reinforcing the concept far more effectively than text alone.
This is why having a good workflow to screen capture from YouTube isn't just a nice-to-have. It’s a fundamental part of turning passive watching into active, effective learning.
You can start capturing frames from videos right now without installing anything. The tools are built into your operating system. Trying them is a good way to understand the basic workflow—and its frustrations.
The core process is the same on PC or Mac. Find the moment you need, pause the video, and use your system's screenshot tool to grab the image.
It’s straightforward:
On Windows: The shortcut is Windows + Shift + S. This opens the Snip & Sketch tool, letting you draw a box around the part of the video you want. The image is copied to your clipboard.
On macOS: Press Cmd + Shift + 4. Your cursor becomes a crosshair to click and drag over the area. The screenshot saves directly to your desktop.
This manual method works, but it’s clumsy for serious learning. Each capture forces you to stop, break concentration, and perform a series of clicks and drags, pulling you out of your learning flow.
So, how do the built-in tools on Windows and macOS stack up for learning from video? They're similar, but each has its own quirks.
Feature
Windows (Snip & Sketch)
macOS (Screenshot Utility)
Activation
Windows + Shift + S
Cmd + Shift + 4
Capture Type
Rectangular snip, freeform, window, full
Rectangular selection, window, full
Default Save Location
Copies to clipboard (must be pasted/saved)
Saves to Desktop as a .png file
Timestamp Context
None
None
Video Link
None
None
Organization
Requires manual pasting, naming, and filing
Creates desktop clutter with generic file names
While both are fine for a one-off capture, they share the same critical flaw for learners: they offer zero context. The image is completely disconnected from the video source.
The real headache begins after you’ve taken a few screenshots. Your desktop fills with generically named files like Screenshot-2024-05-21-at-11.45.16.png. Nothing connects these images back to the video or your notes.
You’re left with a folder of visual evidence but zero context. Without a direct, clickable link back to the specific moment in the video, the screenshot loses most of its value as a study tool.
This tedious cycle of pausing, capturing, saving, and organizing is the fundamental friction of manual video note-taking. It’s a functional starting point, but it's incredibly slow and disconnected.
As you'll see in our more detailed guide on taking screenshots from YouTube videos, tools designed specifically for this task solve the problem by embedding the capture process directly into your note-taking workflow, keeping you focused and ensuring every visual has the context it needs to be useful.
If you're tired of the clunky manual process, browser extensions are a smarter way to screen capture from YouTube. These tools live inside your browser, so you can stop juggling windows and managing scattered files. This keeps you focused on the content, not the mechanics of capturing it.
The best extensions are built for learners. They don't just snap a picture; they pull that capture directly into your note-taking workflow, immediately solving the context problem of manual methods. This works on any website with video, including YouTube, Udemy, Coursera, or even your university's lecture portal.
Not all extensions are equal. For serious study, you need tools that support your learning process.
Here are the features that actually matter:
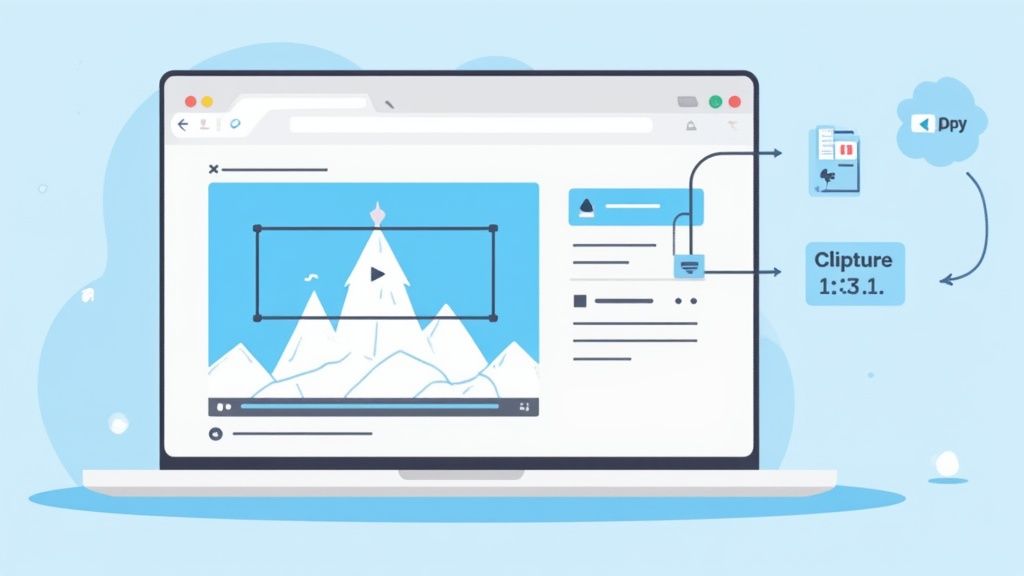
Timestamping: This is the game-changer. A screenshot without a timestamp is a random image. With one, it's a bookmark that lets you click to jump back to that exact moment in the video.
Region Selection (Snip Capture): You rarely need the entire video frame. A good tool lets you "snip" just the important part—a line of code, a diagram, or a formula. This keeps your notes clean and focused.
Direct Note Integration: The capture should land directly inside your notes, not on your desktop. This maintains the connection between the visual cue and your written thoughts.
HoverNotes is a Chrome extension that watches videos with you, generates AI notes, and saves them as Markdown directly to your file system. It’s built to solve these specific problems.
When you take a screenshot with a dedicated learning tool, it’s no longer a separate file. It becomes a contextual, interactive piece of your study material, embedded exactly where you need it.
With a keyboard shortcut, you can capture the frame, get a clickable timestamp, and embed the image right into your notes. For Obsidian users, this is ideal because notes and images save as plain .md files directly to your local vault. You own the files. Move them, back them up—they're just Markdown.
This workflow eliminates the constant pausing and window-juggling. It keeps you in a state of flow, turning a disruptive chore into a seamless part of learning. For students who need every advantage, exploring the best Chrome extensions for students can uncover tools that genuinely boost study efficiency.
#How to Organize Your Screenshots for Effective Recall
Grabbing a screen capture from YouTube is easy. The hard part is organizing it. A folder full of random image files isn't a study guide—it's digital clutter.
The real value comes from connecting that visual information directly to your notes. Without context, a screenshot is a static image. With context, it becomes a powerful memory trigger. That's why embedding captures directly into your notes is so effective. The visual proof is right there next to the concepts.
The best way to organize screenshots is to link them back to the exact moment they came from. This is where features like timestamping are essential. Imagine reviewing your notes, clicking a screenshot, and instantly jumping back to that precise moment in the video. No more hunting and scrubbing through timelines.
This is exactly what tools like HoverNotes are built for. Every screenshot includes a clickable timestamp—one click returns you to that exact moment. It removes the friction between your notes and the source material.
With over 14 billion videos on YouTube as of 2025, the platform is a colossal library of knowledge. The ability to screen capture is crucial, but making those captures genuinely useful is the real challenge. You can explore more about YouTube's scale over on awisee.com.
For those using local-first tools like Obsidian, this approach is even more powerful. When you use a tool that saves notes as local Markdown files, your screenshots are stored alongside the text files in your own vault. You aren't locked into a proprietary cloud service.
You own your data. The .md files and images are on your machine. Your notes belong to you.
It’s future-proof. Markdown is a universal standard that isn’t going anywhere.
It builds a true knowledge graph. Your visual and written notes become deeply interconnected, creating a richer study resource.
Good organization isn't about tidy folders. It's about creating a system where every piece of information is connected and easy to find when you need it. For a deeper dive, check out our guide on turning a YouTube video into notes.
Screenshots give you the "what," but you still need the "why" and "how." An effective way to learn from video is to blend AI-driven summaries with your own targeted visual captures.
This approach lets AI handle the grunt work of transcription so you can focus on understanding the material. The best tools for this do more than just read a transcript; unlike tools that only parse transcripts, HoverNotes watches the video frame-by-frame to capture what's actually on screen. This is a critical distinction, as it grabs vital visual context—like diagrams, code, or graphs—that transcript-only tools miss.
The most powerful workflow marries the speed of AI with the precision of your own eye. You let the AI build the foundation, then you enrich it with the specific visuals that made the concept click for you.
Let AI handle the summary: Instantly get a structured outline and key concepts without typing.
You add the visuals: Use timestamped screenshots and screen snips to add the details that matter—the exact line of code, UI element, or chart that pulls it all together.
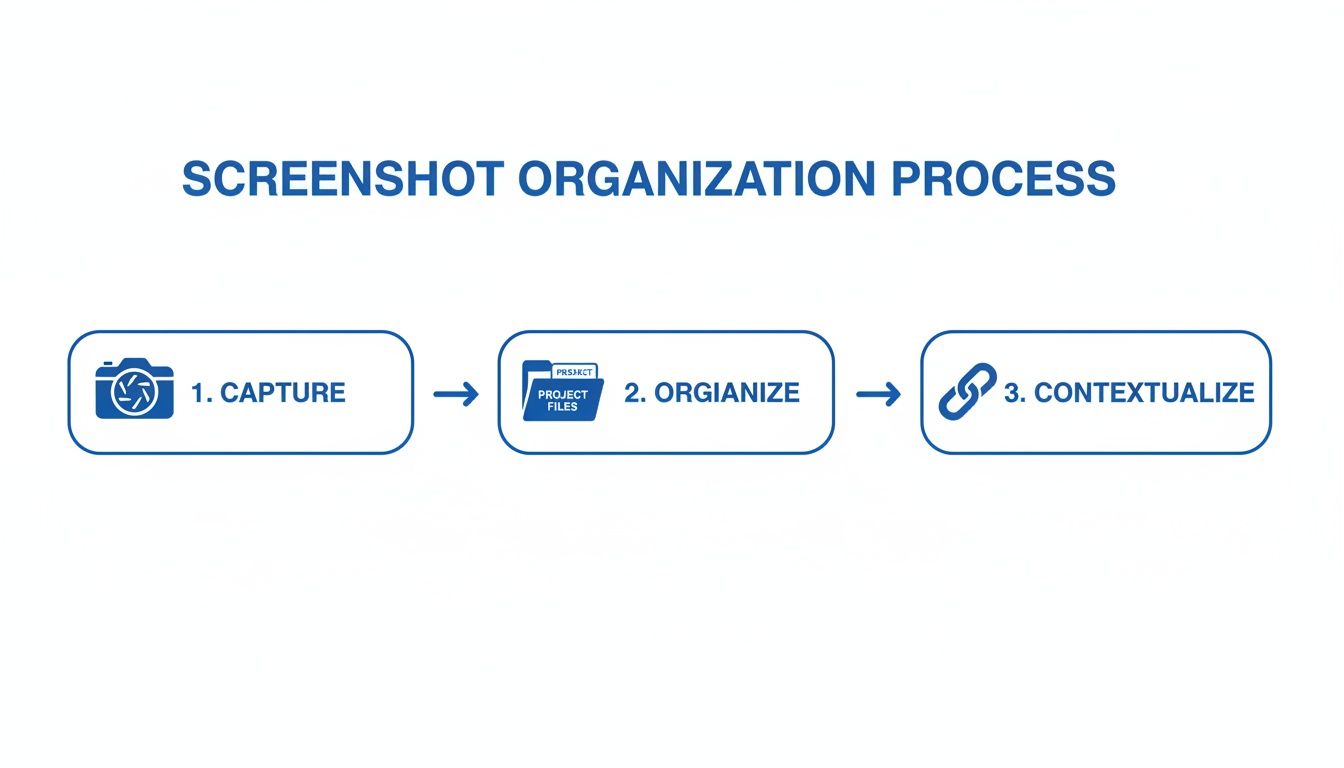
Following this method turns your notes from a flat wall of text into a rich, interactive study guide. This three-step process is all it takes to keep your screen captures organized and useful.
This workflow ensures every visual you save is immediately tied to the right part of your notes, making it easier to recall information later.
The goal is to create notes that work for your brain. By letting AI handle bulk transcription, you can focus your attention on capturing the visual moments that trigger genuine understanding and long-term memory.
This integrated approach is a massive upgrade to the learning process. If you want to dive deeper into how this technology works, you can explore the details in our guide on the best AI note taker app for students and lifelong learners.
#A Few Common Questions About Grabbing YouTube Screenshots
As you get into a rhythm of capturing screenshots, a few practical questions always come up. Let's tackle legality, precision, and quality.
This is a common question, and the answer is nuanced. For personal use—like grabbing a slide from a lecture for your study notes—you're almost always in the clear under fair use.
The line is crossed when you start sharing or republishing that content. Building your private knowledge library is fine. Creating a public gallery of someone else's copyrighted work is not. Just ask: "Is this for my brain, or for the public?"
Ever try to pause on the perfect moment, only to miss it by a split second? YouTube has keyboard shortcuts for this.
Once the video is paused, use the comma (,) and period (.) keys. They let you step backward and forward one frame at a time. It’s a game-changer for precision. Find your frame, then use your computer's screenshot tool to grab it.
Some browser extensions take this a step further, letting you "snip" just a portion of the video player. This is useful when you only need a specific code block or a small chart, saving you the hassle of cropping later.
#What's the Secret to Getting High-Quality Screenshots?
Fuzzy screenshots are useless. To make sure your captures are crisp, there are two simple tricks.
First, set the video quality to the highest setting available (1080p or 4K) before taking the shot. Second, enter full-screen mode. This gives you the largest possible image and hides distracting interface elements like the video title and progress bar.
The timestamp screenshot feature alone saves hours of rewatching. You can try it for free with HoverNotes and see for yourself—you get 20 minutes of AI credits on signup, no credit card needed.
Learn how to use the Cornell method for video note taking to improve learning from YouTube or Coursera. This guide offers actionable steps and templates.