Obtener un video de YouTube y sus subtítulos es una forma sencilla de construir una biblioteca de aprendizaje offline enfocada. Te permite estudiar en cualquier lugar, evita las distracciones de la plataforma y te ayuda a construir una biblioteca personal de conocimiento que realmente posees.
Por Qué Descargar Contenido de YouTube para un Aprendizaje Enfocado
Ver videos educativos de YouTube es conveniente, pero no está diseñado para el aprendizaje serio. La plataforma está diseñada para la participación, no para el enfoque profundo. Cada video está flanqueado por una barra lateral de tentadoras recomendaciones, contenido de reproducción automática y anuncios que interrumpen tu concentración.
Para cualquiera que se tome en serio el aprendizaje, ese entorno es un problema.
Descargar el contenido te devuelve el control. Cambia la experiencia de la visualización pasiva a una sesión de estudio activa y enfocada.
Crea una Zona Libre de Distracciones
Cuando descargas un video, lo sacas del ecosistema caótico de la web. No más videos recomendados que te atraigan a una madriguera. No más anuncios emergentes que interrumpan una explicación compleja. No más secciones de comentarios que desvíen tu línea de pensamiento.
Solo estás tú y el material. Esto es esencial para el trabajo profundo que conduce a la retención real de la información.
El aprendizaje en video tiene un problema de retención bien conocido: las personas miran pero no recuerdan. Para una mirada más de cerca a esto, explora nuestra guía para mejorar la retención del aprendizaje en video. Al crear tu propio entorno local, offline, estás activamente rechazando las características de la plataforma que se interponen en el camino del aprendizaje.
Asegura el Acceso Ininterrumpido en Cualquier Lugar
El internet confiable no siempre es un hecho. Ya sea que estés estudiando en tu viaje, viajando o simplemente lidiando con el Wi-Fi irregular de la cafetería, el almacenamiento en búfer y las caídas de conexión pueden matar tu impulso. Tener archivos locales significa que puedes estudiar eficazmente en un avión, en el metro o durante una interrupción de Internet sin perder el ritmo.
Esto es especialmente crucial para los estudiantes de idiomas que necesitan analizar frases específicas fotograma a fotograma. Pausar, rebobinar y examinar los subtítulos es una experiencia mucho más fluida con un archivo local que con un reproductor de transmisión que constantemente intenta almacenar en búfer.
Construye una Biblioteca Permanente de Conocimiento
El contenido en internet es frágil. Los videos se eliminan, los canales desaparecen y las plataformas cambian sus reglas. Si estás construyendo una base de conocimiento personal en una herramienta como Obsidian, confiar en enlaces web es una receta para el desastre. Tu colección de ideas cuidadosamente seleccionada podría desaparecer de la noche a la mañana.
Poseer tus materiales de aprendizaje es un principio fundamental para cualquier trabajador del conocimiento serio. Cuando descargas un video y sus subtítulos, creas un activo permanente, local primero. Te pertenece para siempre, sin importar lo que suceda en línea.
Este no es un hábito de nicho; está impulsado por una demanda global masiva. YouTube está en camino de alcanzar 2.85 mil millones de usuarios para 2025, con una increíble cantidad de contenido subido cada minuto. Esta explosión de información, particularmente en mercados como India (491 millones de usuarios) y los EE. UU. (253 millones), ha amplificado la necesidad de acceso offline. Puedes verlo en el aumento de YouTube Premium a 125 millones de suscriptores, muchos de los cuales pagan solo por esta función. Para obtener más información sobre esto, consulta las últimas estadísticas de crecimiento de usuarios de YouTube en GlobalMediaInsight.com.
Al descargar, estás creando tu propia biblioteca privada y premium, sin la tarifa mensual.
Comparando Métodos para Descargar Videos y Subtítulos
Tienes tres formas principales de descargar videos de YouTube y sus subtítulos. Cada uno tiene sus pros y sus contras, desde rápido y simple hasta poderoso y preciso.
Elegir la herramienta adecuada depende de tu objetivo. ¿Solo estás obteniendo un solo video para un vuelo? ¿O eres un estudiante que está construyendo una biblioteca permanente, offline, de contenido educativo? Repasemos las opciones.
Sitios Web de Descarga Online
Esta suele ser la primera parada. Encuentras un sitio, pegas la URL de YouTube y haces clic en "Descargar". Es rápido y no requiere instalación, lo que parece perfecto para una tarea única.
Pero esa conveniencia a menudo tiene un costo. Estos sitios suelen estar llenos de anuncios emergentes agresivos, botones de descarga engañosos y rastreadores. En el peor de los casos, pueden ser una puerta de entrada para malware. Si valoras tu privacidad, usarlos regularmente se vuelve agotador.
Mejor para: La descarga ocasional, no crítica, cuando necesitas un video de inmediato y estás dispuesto a navegar por algunos obstáculos digitales.
Extensiones del Navegador
Las extensiones del navegador son un buen punto intermedio. Viven en tu navegador y, por lo general, agregan un botón de "descarga" directamente en la página de YouTube. No más copiar y pegar enlaces en otra pestaña: es un flujo de trabajo mucho más fluido.
¿La trampa? La calidad y la seguridad varían ampliamente. Chrome Web Store tiene muchas opciones, pero algunas se rompen cuando YouTube actualiza su diseño, otras son abandonadas por sus desarrolladores y algunas pueden recopilar más datos de los que te sientes cómodo. Encontrar una buena requiere algo de investigación. Hemos elaborado una lista de las mejores extensiones de Chrome para la productividad que prioriza la seguridad.
Mejor para: Cualquiera que descargue videos con regularidad y prefiera una interfaz gráfica. Es un equilibrio sólido de conveniencia y poder si encuentras una extensión de buena reputación.
Herramientas de Línea de Comandos como yt-dlp
Para el estudiante serio, el archivista digital o cualquier persona que quiera control absoluto, las herramientas de línea de comandos son la mejor opción. Específicamente, yt-dlp, una bifurcación del conocido youtube-dl, es el estándar de oro. Es gratuito, de código abierto y se mantiene activamente.
Sí, hay una curva de aprendizaje. Estarás en una terminal escribiendo comandos en lugar de hacer clic en botones. Pero el poder que obtienes a cambio es significativo.
Con yt-dlp, puedes:
- Descargar listas de reproducción o canales completos con un solo comando.
- Especificar la calidad del video, el formato y los códecs de audio.
- Descargar de forma fiable todos los archivos de subtítulos disponibles, incluidos los generados automáticamente.
- Automatizar las descargas con scripts simples.
Debido a que se ejecuta localmente, evitas todos los anuncios, rastreadores y problemas de privacidad de los servicios en línea. Es el método más poderoso y privado disponible.
Mejor para: Estudiantes dedicados y trabajadores del conocimiento que construyen una biblioteca offline seria. Si planeas descargar contenido con regularidad, el tiempo que lleva aprender yt-dlp es una inversión que vale la pena.
Para ayudarte a decidir, aquí tienes una comparación rápida de los pros, los contras y los casos de uso ideales para cada método.
Comparación de Métodos de Descarga de YouTube
| Método | Pros | Contras | Mejor Para |
|---|---|---|---|
| Sitios Web Online | Rápido, no requiere instalación. | Muchos anuncios, posibles riesgos de seguridad, opciones limitadas. | Descargas poco frecuentes y únicas cuando la conveniencia es clave. |
| Extensiones del Navegador | Conveniente, integrado en tu navegador. | Varía en calidad y seguridad, puede romperse con las actualizaciones. | Descargadores regulares que prefieren una interfaz gráfica. |
| yt-dlp (CLI) | Máximo control, descargas por lotes, automatización, privado. | Curva de aprendizaje más pronunciada, requiere el uso de la terminal. | Estudiantes serios, archivistas y usuarios avanzados. |
La "mejor" herramienta depende de tus necesidades. Para uso casual, un sitio web o una extensión pueden ser suficientes. Pero para construir una base de conocimiento duradera, nada supera el control de una herramienta de línea de comandos.
Este árbol de decisiones puede ayudarte a visualizar cuándo la descarga pasa de ser una simple conveniencia a una parte esencial de tu proceso de aprendizaje.
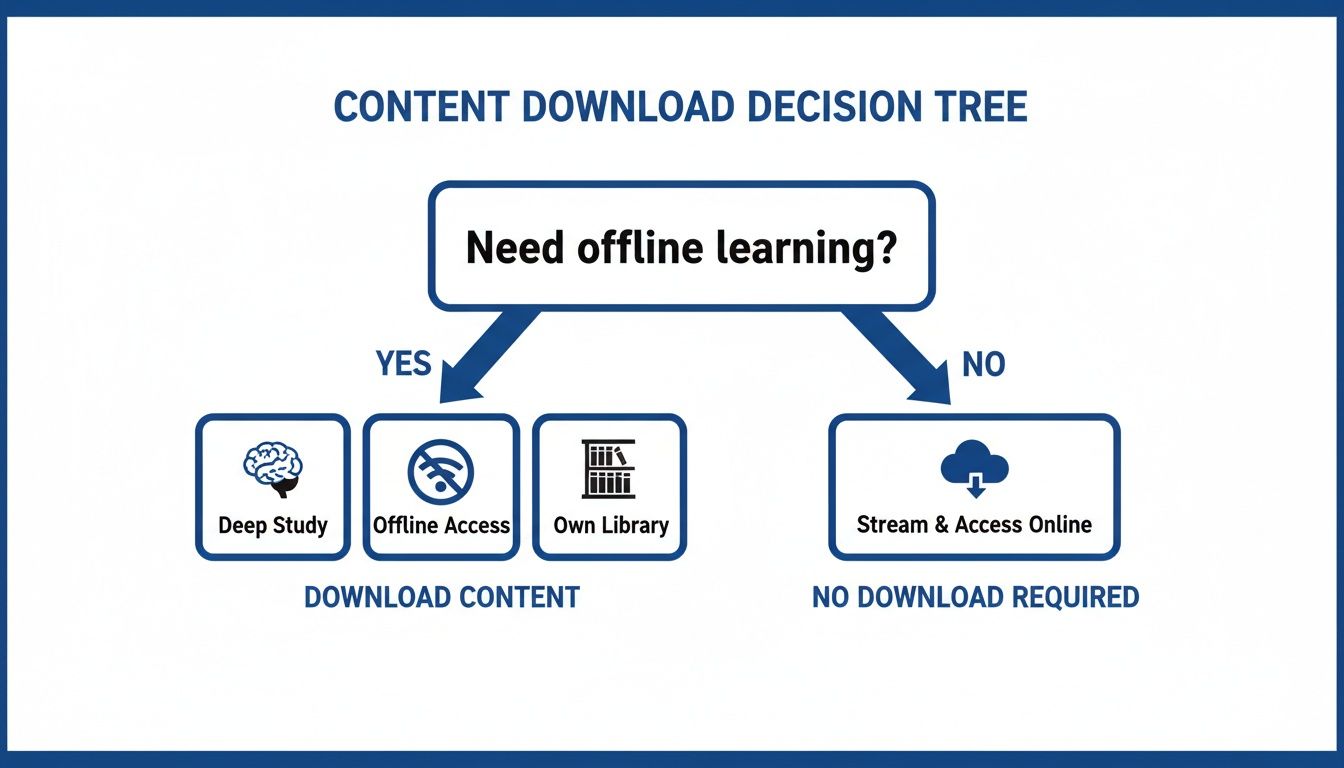
Para el aprendizaje deliberado y profundo, donde el enfoque, la revisión y el acceso permanente son críticos, la descarga no es solo un extra. Es una parte central de la rutina de estudio.
Una Guía Práctica para Usar yt-dlp
Si estás listo para ir más allá de las herramientas web para obtener el máximo control, yt-dlp es la mejor opción. Es una herramienta de línea de comandos que te da un control preciso sobre todo el proceso de descarga.
No dejes que la parte de "línea de comandos" te intimide. Los conceptos básicos son simples, y una vez que esté configurado, tendrás un flujo de trabajo poderoso y confiable. Esta guía te instalará y ejecutará los comandos esenciales para descargar videos y sus subtítulos.
Instalando yt-dlp en Tu Sistema
Poner en marcha yt-dlp es una configuración rápida y única. El proceso varía ligeramente según el sistema operativo.
-
Para Windows: La forma más fácil es descargar el archivo
yt-dlp.exede la página oficial de lanzamientos de yt-dlp en GitHub. Guárdalo en un lugar memorable, como una carpetaToolsen tu directorio de usuario. Ejecutarás tus comandos desde allí. -
Para macOS y Linux: Si utilizas Homebrew (macOS) o un administrador de paquetes estándar de Linux, la instalación es un solo comando. Abre tu Terminal y ejecuta
brew install yt-dlppara macOS. En Linux, utiliza un comando comosudo apt-get install yt-dlp, aunque puede variar según tu distribución.
Una vez instalado, abre tu símbolo del sistema (Símbolo del sistema o PowerShell en Windows, Terminal en macOS/Linux), y estás listo para comenzar.
Descargas Básicas de Video y Audio
Comencemos con el comando más básico. Para descargar un video en su mejor calidad predeterminada, solo necesitas el nombre del programa y la URL del video.
yt-dlp "VIDEO_URL"
Simplemente reemplaza "VIDEO_URL" con el enlace real de YouTube. El archivo de video se descargará en la carpeta donde estás ejecutando el comando.
Si solo quieres el audio de una conferencia o un podcast, puedes extraerlo como un MP3 utilizando el indicador -x.
yt-dlp -x --audio-format mp3 "VIDEO_URL"
Este comando descarga el audio, lo convierte a MP3 y descarta el archivo de video, ahorrando una cantidad significativa de espacio. Es perfecto para escuchar contenido sobre la marcha.
Dominando las Descargas de Subtítulos
Aquí es donde yt-dlp destaca para los estudiantes serios. Obtienes un control preciso sobre qué subtítulos descargas, lo cual es excelente para el aprendizaje de idiomas o para crear transcripciones con capacidad de búsqueda para tus notas.
Primero, verifica qué idiomas de subtítulos están disponibles para un video utilizando el indicador --list-subs.
yt-dlp --list-subs "VIDEO_URL"
Este comando no descarga nada. Solo muestra una tabla de todas las pistas de subtítulos disponibles, sus códigos de idioma (por ejemplo, en para inglés, es para español) y si se crearon manualmente o se generaron automáticamente.
Una vez que conoces el código de idioma, puedes descargar los subtítulos con el video.
Comando Clave para Subtítulos: Los indicadores más comunes son
--write-subspara obtener un archivo de subtítulos creado manualmente y--sub-langpara especificar el idioma. Para los subtítulos en inglés, el comando es:
yt-dlp --write-subs --sub-lang en "VIDEO_URL"
Esto descargará el video y un archivo .srt o .vtt separado con los subtítulos en inglés. La mayoría de los reproductores multimedia como VLC detectan y muestran automáticamente estos cuando reproduces el video.
Si un video no tiene subtítulos creados por humanos, muchos creadores confían en los subtítulos automáticos de YouTube. Puedes descargar esos con el indicador --write-auto-subs.
yt-dlp --write-auto-subs --sub-lang en "VIDEO_URL"
Esto es extremadamente útil cuando no existen subtítulos oficiales. Solo ten en cuenta que los subtítulos generados automáticamente pueden ser inexactos, especialmente con términos técnicos o acentos. Son útiles pero no deben tratarse como una transcripción perfecta. Para obtener más ideas sobre cómo trabajar con contenido de YouTube, consulta nuestra guía para aprovechar al máximo los tutoriales de YouTube.
Juntando Todo
Con estos comandos básicos, puedes construir un flujo de trabajo eficiente para crear una biblioteca offline de materiales de aprendizaje. Puedes descargar un video, obtener sus subtítulos en varios idiomas e incluso archivar listas de reproducción completas con un solo comando. La confiabilidad de yt-dlp significa que pasas menos tiempo lidiando con sitios web torpes y más tiempo aprendiendo.
Esta es una habilidad fundamental para cualquier persona que esté construyendo un sistema de gestión de conocimiento personal local primero. Al tener tanto el video como el archivo de texto en tu máquina, garantizas que tus recursos de aprendizaje sean permanentes, privados y siempre estén disponibles.
Entonces, has descargado un video de YouTube y sus subtítulos. Ahora tienes dos archivos: un video (como un .mp4) y un archivo de texto (un .srt o .vtt). Estas son tus materias primas. Con un poco de trabajo, puedes convertirlos en un sistema de estudio interactivo.
Haciendo que se Muestren los Subtítulos
Primero, hagamos que se muestren los subtítulos. Los archivos como SRT (SubRip Text) y VTT (WebVTT) son archivos de texto simples que emparejan las palabras habladas con marcas de tiempo, diciéndole a tu reproductor de video qué texto mostrar y cuándo.
La mayoría de los reproductores multimedia modernos, como el confiable VLC, manejan esto automáticamente. Solo asegúrate de que tu video y el archivo de subtítulos tengan el mismo nombre exacto y estén en la misma carpeta.
Por ejemplo:
Quantum_Physics_Lecture_1.mp4Quantum_Physics_Lecture_1.srt
Reproduce el video y deberían aparecer los subtítulos. Esto por sí solo es una gran victoria para el aprendizaje offline, especialmente para los estudiantes de idiomas que ahora pueden pausar y analizar una frase específica sin almacenamiento en búfer.
Convirtiendo los Subtítulos en una Transcripción con Capacidad de Búsqueda
Aquí es donde se vuelve útil para construir una base de conocimiento. Un archivo de subtítulos es esencialmente una transcripción con marca de tiempo. Si eliminas las marcas de tiempo, te queda texto plano que puedes colocar en cualquier aplicación para tomar notas como Obsidian o Notion.
Una versión de texto completa y con capacidad de búsqueda de una conferencia es una herramienta poderosa. De repente, puedes usar
Ctrl+Fpara encontrar el momento exacto en que un profesor mencionó el "Principio de Incertidumbre de Heisenberg" o copiar una definición clave directamente en tus notas de estudio.
Esto transforma un video de una hora de duración de una caja negra que no se puede buscar en un documento consultable. Si quieres explorar diferentes métodos, puedes profundizar en cómo transcribir un video de YouTube para tus notas.
Pero hay una limitación significativa al confiar solo en el texto.
Por Qué las Transcripciones Pierden el Contexto Visual
Una transcripción te dice lo que se dijo. Omite por completo lo que se mostró. Para la mayoría del contenido educativo, desde tutoriales de codificación hasta conferencias de química, los elementos visuales son tan importantes como las palabras.
Considera estos escenarios comunes donde una transcripción se queda corta:
- Tutoriales de Codificación: El texto no capturará el código que se está escribiendo en la pantalla o el mensaje de error que aparece en la terminal.
- Conferencias de Ciencia: Se pierde la estructura química que se dibuja en una pizarra o el diagrama animado que explica la mitosis celular.
- Demostraciones de Software: No verás qué elemento del menú hizo clic el instructor o la casilla de verificación específica que seleccionó en un panel de configuración.
Confiar solo en una transcripción es como intentar armar muebles con instrucciones que no tienen diagramas. Obtienes las palabras, pero pierdes el contexto crucial. Esto te obliga a volver al video, moviéndote hacia adelante y hacia atrás para encontrar el elemento visual que necesitas.
Cerrando la Brecha Entre Texto y Visuales
Un sistema de aprendizaje ideal combina la capacidad de búsqueda del texto con el rico contexto de los elementos visuales. Podrías hacer esto manualmente: pausar el video para tomar capturas de pantalla y luego intentar organizar esas imágenes y hacerlas coincidir con tus notas. Es un proceso tedioso e ineficiente.
Las herramientas más inteligentes pueden automatizar esto. Por ejemplo, HoverNotes es una extensión de Chrome que mira videos contigo, genera notas de IA y las guarda como Markdown directamente en tu sistema de archivos. A diferencia de las herramientas que solo analizan las transcripciones, HoverNotes mira el video para capturar lo que realmente está en la pantalla.
Cuando la IA identifica un concepto clave, no solo lo escribe; captura una captura de pantalla con marca de tiempo del diagrama, el fragmento de código o la diapositiva relevantes. Esto incrusta el contexto visual directamente en tus notas. Cada captura de pantalla incluye una marca de tiempo en la que se puede hacer clic: un clic te devuelve a ese momento exacto en el video.
Este flujo de trabajo resuelve el problema de las notas desconectadas y las capturas de pantalla dispersas, creando un solo activo de aprendizaje rico que posees. La función de captura de pantalla con marca de tiempo por sí sola puede ahorrarte horas de volver a ver.
Comprendiendo las Directrices Legales y Éticas
Antes de comenzar a construir tu biblioteca offline, es importante que comprendas las reglas. No se trata de jerga legal; se trata de ser un usuario responsable que respeta a los creadores.
La distinción central es uso personal frente a redistribución. Piénsalo como un libro de texto que compras para una clase. Eres libre de resaltarlo y escribir notas en los márgenes para tu propio beneficio. Lo que no puedes hacer es fotocopiar todo el libro y distribuirlo. La misma lógica se aplica aquí.
Descargar una conferencia para verla offline o obtener sus subtítulos para practicar un idioma generalmente entra dentro del uso educativo personal. Cruzas una línea cuando comienzas a compartir, volver a subir o mostrar públicamente ese contenido.
Explicación de los Términos de Servicio de YouTube
Los Términos de Servicio oficiales de YouTube son claros: no debes descargar ningún contenido a menos que YouTube proporcione un botón o enlace de "descarga" explícito. Esta es una regla amplia diseñada para proteger la propiedad intelectual de los creadores.
Sin embargo, la realidad es más matizada, especialmente al considerar el concepto de "uso justo".
El Principio del Uso Justo para el Estudio Personal
El uso justo es una doctrina legal que permite el uso de material con derechos de autor sin permiso en ciertas circunstancias, particularmente para la enseñanza, la erudición o la investigación.
Conclusión Clave: Para un estudiante o autodidacta, descargar un video educativo público para estudio privado y toma de notas a menudo entra en un área gris que se inclina hacia el uso justo personal. Estás transformando el contenido para un nuevo propósito educativo que no daña la capacidad del creador para monetizar su trabajo.
Los factores críticos son tu intención y alcance. Tu objetivo es privado, no comercial y educativo. No estás compitiendo con el creador; solo estás interactuando más profundamente con su material.
Mejores Prácticas para Mantenerte en el Lado Correcto
Para asegurarte de que estás alineado con el uso personal ético, sigue algunos hábitos simples. Esto te permite respetar a los creadores mientras mejoras tu propio aprendizaje.
- Nunca Vuelvas a Subir ni Redistribuir: Esta es la regla más importante. No compartas archivos de video descargados ni los subas a otra plataforma. Tu copia descargada es solo para tu uso.
- Quédate con Contenido Disponible Públicamente: Solo descarga videos que ya sean públicos. No intentes eludir los muros de pago ni acceder a videos privados que no tengas permiso para ver.
- Apoya a los Creadores Cuando Puedas: Si el trabajo de un creador es valioso para ti, muestra tu aprecio. Dale me gusta a sus videos, suscríbete a su canal o apóyalos a través de una membresía o Patreon si tienen uno.
- Prioriza la Privacidad y la Seguridad: Muchos sitios web de descarga de terceros están llenos de anuncios, ventanas emergentes y rastreadores. Usar una herramienta que se ejecute localmente en tu máquina, como yt-dlp, es una forma mucho más segura de proteger tus datos. Cualquier herramienta que utilices debe respetar tu privacidad de forma predeterminada, algo sobre lo que puedes leer más en nuestros propios términos de servicio de HoverNotes.
Siguiendo estos principios, puedes construir tu base de conocimiento offline mientras respetas el esfuerzo que los creadores ponen en su contenido.
¿Tienes Preguntas? Tengo Respuestas
Cuando empiezas a descargar videos y subtítulos de YouTube, suelen surgir algunas preguntas comunes. Aquí hay respuestas rápidas basadas en la experiencia.
¿Puedo Descargar Subtítulos en un Idioma Diferente?
Sí, siempre y cuando estén disponibles para ese video.
La mayoría de las buenas herramientas, como yt-dlp, te permiten enumerar todas las pistas de subtítulos disponibles. A partir de ahí, solo eliges el código de idioma que deseas. Esto es invaluable para los estudiantes de idiomas que quieren escuchar en un idioma y leer en otro.
¿Cuál es la Verdadera Diferencia Entre los Subtítulos Manuales y los Generados Automáticamente?
Los subtítulos manuales son creados por un humano (generalmente el creador), mientras que los generados automáticamente son creados por la IA de voz a texto de YouTube.
La diferencia de calidad es significativa. Los subtítulos manuales son casi siempre precisos y tienen el tiempo correcto. Los subtítulos automáticos a menudo contienen errores, especialmente con acentos, habla rápida o terminología técnica. Son mejores que nada, pero no puedes confiar en ellos para obtener detalles críticos. Siempre prepárate para verificarlos con el audio.
Mis Subtítulos Descargados Están Desincronizados. ¿Cómo Soluciono Esto?
Este es un problema común y solucionable.
Puedes utilizar software gratuito para ajustar el tiempo. Recomiendo Subtitle Edit para Windows o Aegisub para usuarios de Mac/Linux. Ambas herramientas te permiten aplicar un simple desplazamiento de tiempo. Puedes indicarle que adelante todos los subtítulos 1.5 segundos (o lo que sea necesario) para sincronizarlos perfectamente con el audio.
¿Son Seguros Esos Sitios Web de Descarga de YouTube Online?
Tendría mucho cuidado. Algunos están bien, pero muchos están llenos de anuncios emergentes agresivos, botones de descarga engañosos e incluso malware. También estás compartiendo datos sobre tus hábitos de visualización.
Para cualquier persona que planee descargar videos más de una vez, una herramienta de línea de comandos como yt-dlp es una opción mucho más segura. Se ejecuta en tu propia máquina, manteniendo tu actividad privada y tu computadora segura. La configuración inicial es un pequeño precio a pagar por la tranquilidad a largo plazo.
Si estás construyendo una biblioteca de conocimiento en Obsidian, organizar manualmente las notas de video y las capturas de pantalla es tedioso. HoverNotes captura capturas de pantalla con marca de tiempo y genera notas de IA a partir de cualquier video, guardándolas como archivos Markdown limpios directamente en tu almacén. Puedes probarlo gratis en hovernotes.io.