Видеозаметки для онлайн-курсов: практическое руководство по запоминанию просмотренного | HoverNotes
General3 января 2026 г.
Видеозаметки для онлайн-курсов: практическое руководство по запоминанию просмотренного
Перестаньте забывать то, что вы смотрите на онлайн-курсах. Изучите практический рабочий процесс для создания видеозаметок, который улучшает запоминание и интегрируется с вашей базой знаний.
Автор HoverNotes Team•13 мин чтения
Вы бывали в такой ситуации. Вы часами сидите над курсом на Udemy или Coursera, впитывая каждую деталь, только чтобы через неделю понять, что большая часть забыта. Это не только ваша проблема; это общая проблема при обучении по видео. Решение — перейти от пассивного просмотра к активному вовлечению, и начинается это с ведения эффективных видеозаметок.
Это разочаровывающий цикл. Вы записываетесь на курс, смотрите лекции и чувствуете себя продуктивным. Но когда вы пытаетесь применить эти знания, детали становятся туманными. Это «иллюзия понимания» — пассивный просмотр создает , что вы учитесь, но не формирует прочных нейронных связей, необходимых для долговременного запоминания.
ощущение
Ваш мозг — не губка; это мышца. Простое воспроизведение видео не заставляет ваш мозг работать над обработкой, организацией и связыванием информации. Проблема в том, что обучение по видео почти слишком простое. Постоянный поток информации не создает необходимого когнитивного трения, которое заставляет мозг включаться и запоминать.
Вот почему как вы делаете видеозаметки важнее, чем само содержание курса.
Без активного участия — резюмирования концепции своими словами, задавания вопросов преподавателю или связывания новых идей с тем, что вы уже знаете — информация редко переходит из кратковременной памяти в долговременную. Это разница между прослушиванием песни и обучением ее игре. Одно — пассивно и временно; другое — создает прочный навык.
Ручной процесс создания заметок по видео утомителен. Постоянные паузы и возобновления воспроизведения нарушают концентрацию. Создание скриншотов приводит к появлению папки со случайно названными файлами без контекста. Писать в блокноте, пытаясь смотреть на экран, просто неудобно. Это трение часто заставляет людей сдаваться и возвращаться к пассивному просмотру.
Данные показывают явную разницу в результатах:
Действие
Начальное понимание
Долговременное запоминание
Способность применять знания
Пассивный просмотр
Кажется высоким, но поверхностно.
Очень низкое. Кривая забывания проявляется в течение 48 часов.
Минимальная. Вы не можете вспомнить детали, когда это необходимо.
Активное ведение заметок
Медленнее и более обдуманно, но ведет к более глубокому пониманию.
Значительно выше. Создает прочные следы в памяти.
Высокая. Вы можете извлекать и применять концепции в новых ситуациях.
Переход от пассивного к активному обучению — это не про то, чтобы учиться больше; это про изменение способа обучения. Цель — намеренно прерывать поток информации и заставлять мозг работать с материалом.
Это одно изменение — от простого просмотра к активному ведению заметок — является самым эффективным способом гарантировать, что время, вложенное в онлайн-курсы, окупится. Для более глубокого изучения ознакомьтесь с нашим руководством по обучению по видео и запоминанию.
Знания, которые вы получаете, становятся постоянной частью вашего инструментария, а не просто мимолетным опытом.
Большинство «видеозаметок» — это просто транскрипты. Стена текста упускает визуальную половину истории — диаграммы на слайде, код на экране или демонстрацию преподавателя. Транскриптам не хватает контекста.
Эффективные заметки фиксируют и что было сказано, и что было показано. Это критически важно для технических предметов, где один скриншот формулы или фрагмента кода стоит абзацев текста.
#Больше, чем просто транскрипт: почему важен визуальный контекст
Представьте, что вы пытаетесь изучать матанализ, не видя уравнений на доске. Или изучаете программный фреймворк, не видя кода. Вы теряете самый важный контекст. В этом и заключается основная слабость инструментов, работающих только с транскриптами.
Полезные видеозаметки должны включать:
Ключевые визуальные элементы: Скриншоты важных слайдов, графиков или диаграмм.
Конкретные примеры: Захват фрагментов кода, формул или пошаговых процессов.
Ваши собственные инсайты: Вопросы, связи и резюме, которые превращают информацию в знания.
Мы все пробовали ручной метод: поставить видео на паузу, сделать скриншот, сохранить его в случайную папку, а затем попытаться сослаться на него в отдельном текстовом файле. Это неуклюже, и скриншоты оказываются разбросанными и оторванными от заметок, которые они должны поддерживать. Если у вас есть только текст, вы можете узнать, как сделать транскрипт видео с YouTube, но современный рабочий процесс должен легко интегрировать визуальные элементы.
Одной из самых практичных функций для видеозаметок является кликабельная временная метка. Это решает огромную проблему: найти тот единственный конкретный момент в 90-минутной лекции, где преподаватель объяснял ключевую концепцию. Вместо того чтобы перематывать вперед и назад, заметка с временной меткой позволяет вам кликнуть и мгновенно вернуться к этой точной точке в видео.
Это превращает ваши заметки из статичного документа в интерактивное учебное пособие, экономя часы на повторном просмотре контента, который вы уже поняли.
Инструмент вроде HoverNotes, расширения для Chrome для учащихся, автоматизирует это. В отличие от инструментов, которые только анализируют транскрипты, HoverNotes следит за видео, чтобы зафиксировать то, что на самом деле происходит на экране. Каждый сделанный им скриншот включает кликабельную временную метку, связывая визуальный элемент непосредственно с его источником для мгновенного контекста.
Последний элемент — это структура. Хорошие видеозаметки — это организованный актив. Добавляя свои собственные заголовки, резюме и вопросы, вы строите ментальную структуру вокруг темы.
Это отделяет пассивную запись от динамичного учебного инструмента. для пользователей Obsidian сохранение заметок непосредственно в виде файлов Markdown означает, что они сразу же становятся частью вашего «второго мозга». Вы можете связывать их, добавлять теги и искать по ним вечно. для тех, кто использует Notion, не менее важны заметки, которые можно аккуратно скопировать с сохранением форматирования и изображений.
Этот интегрированный подход делает ваши видеозаметки ценными не только для экзамена, но и для создания прочной базы знаний, которой вы владеете.
#Создание вашего личного рабочего процесса для ведения заметок
Создание системы для ваших видеозаметок — это создание повторяемого процесса, который соответствует вашему стилю обучения. Отличный рабочий процесс должен быть почти незаметным, позволяя вам перейти от просмотра лекции к организованным, доступным для поиска заметкам, не нарушая концентрации.
Ручной подход — это то, на чем спотыкается большинство людей. Постоянные паузы для набора текста нарушают ваш поток. Захват скриншотов загромождает ваш рабочий стол файлами вроде Снимок экрана 2024-10-26 в 11.45.12.png. Это трение превращает обучение в рутину.
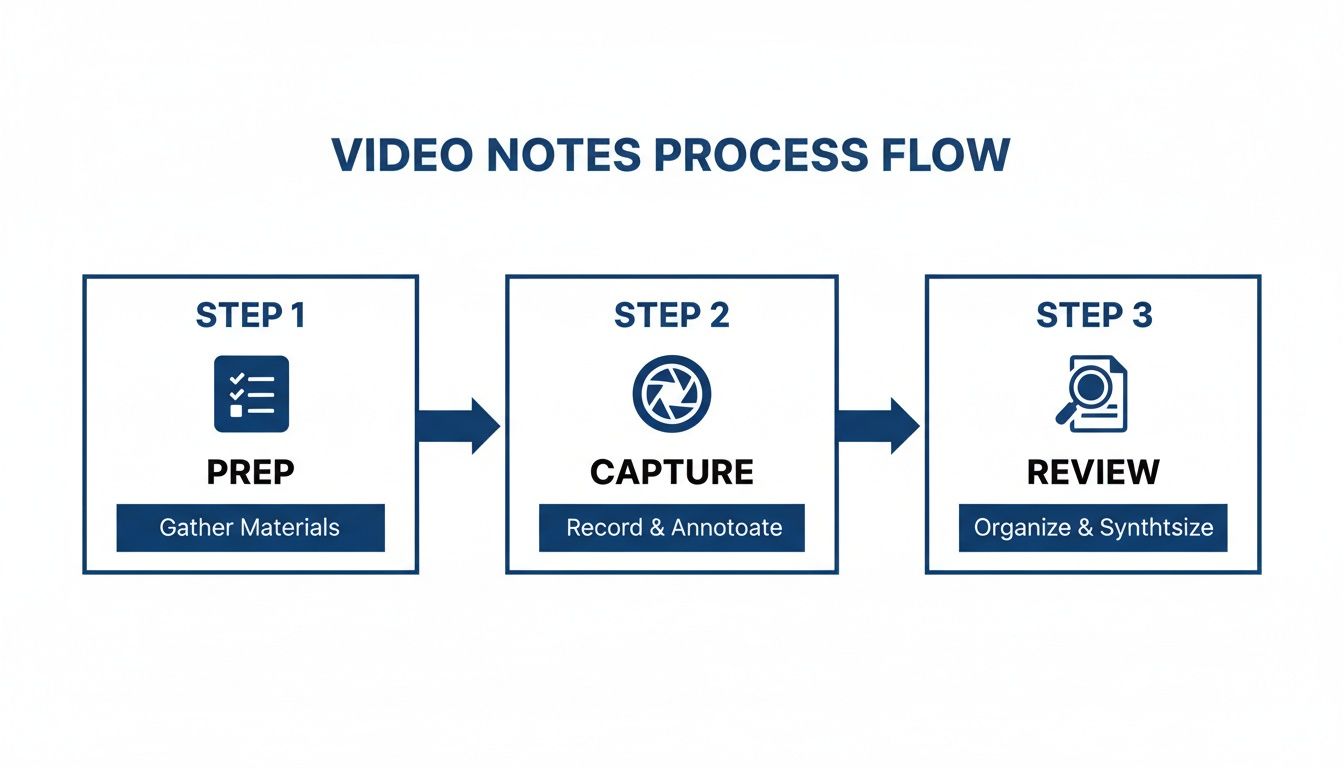
Эффективный рабочий процесс состоит из трех частей: подготовка, захват и просмотр. Цель — сделать этап захвата максимально плавным, чтобы вы могли сосредоточиться на понимании материала, а не на борьбе с инструментами.
Прежде чем нажать на кнопку воспроизведения, потратьте одну минуту на организацию.
Создайте специальную папку: Для курса на Udemy или Coursera создайте одну основную папку. Если вы пользователь Obsidian, эта папка может находиться прямо в вашем хранилище.
Выберите соглашение об именовании: Определите простой способ именования файлов, например, [Номер лекции] - [Название лекции].md (например, 01 - Введение в Python.md). Это автоматически поддерживает порядок.
Эта подготовительная работа гарантирует, что ваши заметки будут структурированы с самого начала, избавляя вас от цифрового беспорядка, к которому вы никогда не вернетесь.
Именно здесь современные инструменты меняют правила игры. Вместо того чтобы бороться с ручными паузами и скриншотами, вам нужна система, которая работает вместе с вами. ИИ-помощник может взять на себя тяжелую работу, чтобы вы могли сосредоточиться на понимании.
Инструмент вроде HoverNotes — это расширение для Chrome, созданное для этой цели. Он размещает видео и ваши заметки бок о бок в режиме без отвлекающих факторов, который блокирует рекламу на сайте. Он работает на любом веб-сайте с видео — на платформах курсов, таких как Coursera и Udemy, на YouTube и даже на внутренних учебных порталах. У вас есть два способа захвата информации:
Заметки, сгенерированные ИИ: Позвольте ИИ сгенерировать для вас первоначальные заметки. Это берет на себя транскрипцию и суммирование, освобождая ваш мозг для концентрации на концепциях. После этого добавляйте свои собственные мысли, вопросы и связи.
Ручные заметки с умными инструментами: Если вы предпочитаете писать заметки самостоятельно, используйте ручной редактор. Вы все равно получаете бесплатные, скриншоты с временными метками. Одним кликом или сочетанием клавиш вы можете захватить диаграмму или фрагмент кода и вставить его прямо в свои заметки. Вы даже можете использовать инструмент «вырезка», чтобы захватить только определенную область видеокадра.
Этот интегрированный подход решает основную проблему ручного ведения видеозаметок. Если вы хотите изучить другие варианты, наше руководство по лучшим приложениям для ведения заметок для студентов предоставляет более широкий обзор.
Ваши заметки ценны только в том случае, если вы их используете. После видео выделите 5-10 минут на просмотр того, что вы зафиксировали.
Это ваш шанс превратить сырые заметки в настоящие знания. Добавьте вверху резюме своими словами. Выделите ключевые термины. Выпишите все возникшие у вас вопросы и сделайте пометку, чтобы разобраться с ними позже.
Мировой рынок Video-on-Demand (VoD) по прогнозам достигнет 855.9 миллиардов долларов США к 2035 году, большая часть которого будет приходиться на образовательный контент. Поскольку люди тратят часы на обучение по видео, структурированный рабочий процесс — единственный способ превратить это экранное время в знания, которые останутся. Вы можете узнать больше об этих тенденциях рынка VoD здесь.
Создавая простой рабочий процесс, вы не просто делаете заметки — вы строите мощную систему обучения, которая масштабируется от одного туториала до полного сертификационного курса.
#Подключение видеозаметок к вашему «второму мозгу»
Создание отличных видеозаметок — это только половина дела. Если они оказываются в случайной папке, вы теряете большую часть их ценности. Настоящая выгода приходит, когда вы подключаете эти заметки к вашей более крупной системе личных знаний — вашему «второму мозгу».
Для серьезных учащихся, особенно тех, кто использует такие инструменты, как Obsidian или Notion, эта интеграция не подлежит обсуждению. Это разница между разовым учебным занятием и созданием постоянной, доступной для поиска базы знаний, которая растет с каждым пройденным вами курсом.
Основа надежной системы знаний — это открытый формат. Именно здесь идеально подходят простые файлы Markdown (.md). В отличие от проприетарных форматов, которые запирают ваши знания в одном приложении, Markdown — это универсальный простой текст. Он будет читаем на любом устройстве, любым приложением, всегда. Ваши заметки слишком ценны, чтобы быть заложниками системы, которую вы, возможно, не будете использовать через пять лет.
Ваши знания принадлежат вам. Использование открытого формата, такого как Markdown, гарантирует, что вы сохраняете полный контроль. Вы владеете файлами. Перемещайте их, создавайте резервные копии, ищите по ним — это просто Markdown.
Это идеально подходит для пользователей Obsidian. Локальный инструмент, такой как HoverNotes, сохраняет видеозаметки как нативные .md файлы прямо на ваш компьютер. Вы можете указать ему на свое хранилище Obsidian, и каждая заметка, которую вы делаете из видео, мгновенно становится новой, связываемой страницей внутри вашего второго мозга. Заметки остаются на вашей машине; облачная синхронизация не требуется.
Как только ваши видеозаметки оказываются в вашей базе знаний, вы можете начать устанавливать связи. Именно здесь вы переходите от сбора информации к ее синтезу.
Связывайте концепции: Лекция о функциях Python напомнила вам о концепции из курса по структурам данных? Создайте прямую ссылку между двумя заметками.
Используйте теги для поиска: Помечайте заметки, связанные с конкретными проектами (#project-ai-app) или более широкими темами (#machine-learning). Это позволяет вам одним кликом найти все релевантные ресурсы.
Вставляйте визуальные элементы: Скриншот диаграммы или блока кода обеспечивает мгновенный контекст, когда вы возвращаетесь к нему спустя месяцы.
Этот процесс превращает изолированные заметки во взаимосвязанную сеть знаний. Для получения дополнительной информации об этой философии см. наше руководство о том, как построить второй мозг.
Если Notion — ваш командный центр, принципы те же. Вам нужен чистый процесс копирования и вставки, который сохраняет структуру и богатство ваших оригинальных заметок.
Когда ваши заметки создаются с сохранением форматирования и встроенных изображений, вы можете вставить их прямо в базу данных Notion. Это превращает каждую видеолекцию в структурированную запись в вашем трекере курсов, с резюме, ключевыми выводами и визуальными пособиями. Чтобы это работало, вам нужен инструмент, который генерирует заметки, чисто копирующиеся в Notion, включая изображения.
В конечном счете, ваши видеозаметки должны стать постоянными активами, которые создают пополняемую библиотеку личных знаний.
#Решение распространенных проблем при ведении видеозаметок
Даже при хорошем рабочем процессе практические неудобства могут сбить вас с толку. Как управлять заметками для курса из 50 лекций? А что насчет туториала на языке, которого вы не знаете? И не слишком ли медленно набирать все вручную? Давайте разберемся с этими проблемами.
Первая проблема — это организация. Для больших курсов необходима четкая структура файлов. Создайте одну основную папку для каждого курса, а затем отдельный файл заметок для каждой лекции. Четкое соглашение об именовании, такое как 03 - Продвинутые концепции Python.md, упрощает поиск.
Еще одна распространенная проблема — найти идеальный туториал на языке, который вы не понимаете. Вы видите, что происходит, но аудио бесполезно. Современный ИИ может решить эту проблему.
Некоторые инструменты могут обрабатывать видео и генерировать заметки на другом языке. Представьте, что вы смотрите лекцию на японском и получаете структурированные заметки на английском. Открывается новый мир учебного контента. Это не просто перевод; это делегирование утомительной работы по транскрипции и переводу, освобождая вас для концентрации на концепциях.
Если вам просто нужен транскрипт, в нашем руководстве о том, как сделать транскрипт видео с YouTube, есть несколько практических советов.
#Управление длинными курсами и временными ограничениями
Для длинных курсов на платформах вроде Udemy или Coursera нереально делать заметки часами напролет. Критически важна функция «загрузить и продолжить». Она позволяет закрыть браузер, вернуться через несколько дней и продолжить с того места, где вы остановились, с уже загруженными предыдущими заметками.
Эта непрерывность помогает вам оставаться организованным на протяжении длительного курса, превращая марафонскую учебную сессию в управляемые спринты.
Если вы хотите увидеть эти решения на практике, инструмент вроде HoverNotes был создан для решения именно этих проблем. Вы можете попробовать его бесплатно — режим без отвлекающих факторов и скриншоты с временными метками стоят того даже без использования ИИ. Не хотите ИИ? Просто используйте редактор, скриншоты и элементы управления видео — они бесплатны.
Вот ответы на несколько распространенных вопросов о создании системы для видеозаметок.
#Действительно ли цифровые заметки лучше рукописных для видео?
Письмо от руки может помочь закрепить идеи, но для обучения по видео цифровые заметки имеют огромное преимущество. Вы можете вставлять скриншоты диаграммы или строки кода с временными метками. Вы можете ссылаться на точный момент в лекции. Это превращает вашу библиотеку курсов в доступную для поиска визуальную базу данных, которую невозможно воспроизвести вручную. Для огромного объема и визуальной природы видеоконтента цифровой рабочий процесс необходим.
#Как сделать так, чтобы мои заметки не были просто транскриптом?
Транскрипт говорит вам, что было сказано; ваши заметки должны отражать, что это значит для вас. Сосредоточьтесь на трех вещах: ваших инсайтах, визуальном контексте и структуре.
Используйте заголовки для группировки идей.
Делайте скриншоты критически важных визуальных элементов — графиков, кода, слайдов.
Самое главное, добавляйте свои собственные комментарии. Задавайте вопросы. Связывайте идею с тем, что вы уже знаете.
ИИ может сгенерировать резюме, но ваши личные аннотации — ваши моменты «ага!» и вопросы — это то, что превращает сырые заметки в настоящий учебный актив. Цель — база знаний, а не просто запись.
#Могу ли я действительно использовать один инструмент для ведения всех заметок?
Да, но выбирайте с умом. Многие инструменты работают только на определенных платформах, таких как YouTube. Это огромное ограничение. Лучший подход — это расширение для браузера, которое работает на любом веб-сайте с видеоплеером. Это дает вам единый, последовательный рабочий процесс, будь вы на Udemy, Coursera, университетском портале или внутреннем учебном сайте. Ваша система ведения заметок становится универсальной.
Если вы пользователь Obsidian и хотите создать постоянную, доступную для поиска библиотеку из ваших онлайн-курсов, HoverNotes разработан именно для такого рабочего процесса. Он сохраняет ваши видеозаметки в виде чистых файлов Markdown прямо в ваше хранилище.
Откройте для себя локальные заметки и узнайте, как они обеспечивают конфиденциальность и контроль над вашими данными с помощью практических советов по управлению собственными знаниями.
Сложно работать с записанными лекциями? Найдите лучшее приложение для ведения конспектов видеолекций, сравните цифровые и рукописные инструменты, и научитесь владеть своими учебными заметками.